Ingestion Pipeline UI Deployment
In this page we are going to explain how OpenMetadata internally deploys the workflows that are configured from the UI. As of now, OpenMetadata uses Airflow under the hood as a scheduler for the Ingestion Pipelines.
This is the right place if you are curious about our current approach or if you are looking forward to contribute by adding the implementation to deploy workflows to another tool directly from the UI.
Here we are talking about an internal implementation detail. Do not be confused about the information that is going to be shared here vs. the pipeline services supported as connectors for metadata extraction.
For example, we use Airflow as an internal element to deploy and schedule ingestion workflows, but we can also extract metadata from Airflow. Fivetran, for example, is a possible source, but we are not using it to deploy and schedule workflows.
Before Reading
This is a rather deep dive guide. We recommend that you get familiar with the overall OpenMetadata architecture first. You can find that here.
System Context
Everything in OpenMetadata is centralized and managed via the API. Then, the Workflow's lifecycle is also fully managed via the OpenMetadata server APIs. More over, the IngestionPipeline Entity is also defined in a JSON Schema that you can find here.

Note how OpenMetadata here acts as a middleware, connecting the actions being triggered in the UI to external orchestration systems, which will be the ones managing the heavy lifting of getting a workflow created, scheduled and run. Out of the box, OpenMetadata ships with the required logic to manage this connection to Airflow. Any workflow triggered from the UI won't directly run on the server, but instead it will be handled as a DAG in Airflow.
The whole process here will describe in further detail how we transform an incoming request from the UI - in the shape of an Ingestion Pipeline Entity - to a DAG that Airflow can fully manage.
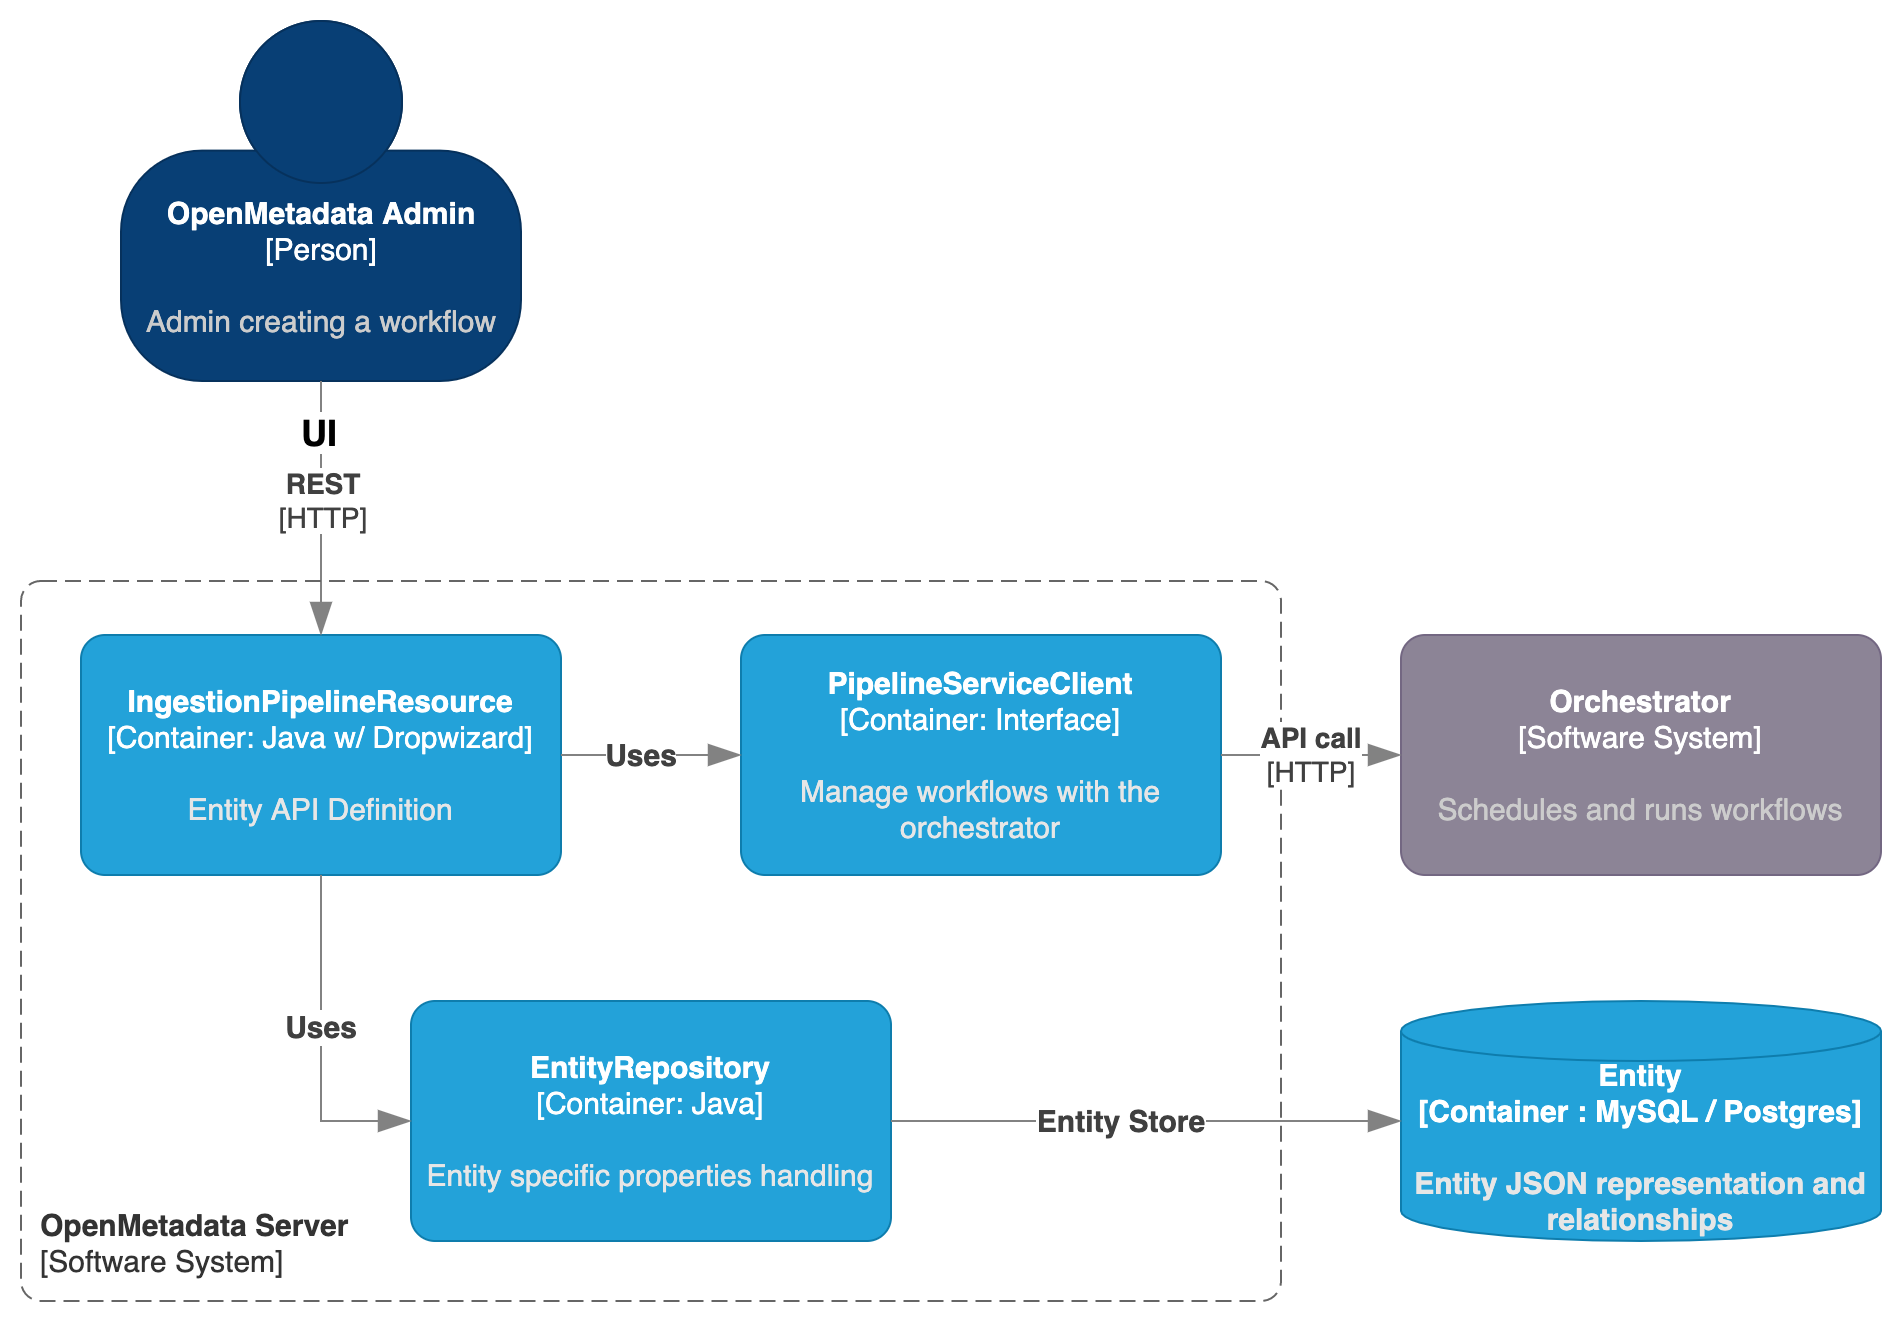
OpenMetadata Server Container Diagram
The main difference between an IngestionPipeline and any other Entity in OpenMetadata is that we need to bind some logic to an external system. Therefore, we are not done by the time we create the Entity itself, but we need an extra component handling the communication between Server and Orchestrator.
We then have the IngestionPipelineResource defining not only the endpoints for managing the Entity, but also routes to handle the workflow lifecycle, such as deploying it, triggering it or deleting it from the orchestrator.
- The Entity management is still handled by the
EntityRepositoryand saved in the Storage Layer as a JSON, - While the communication to the Orchestrator is handled with the
PipelineServiceClient.
While the endpoints are directly defined in the IngestionPipelineResource, the PipelineServiceClient is an interface that decouples how OpenMetadata communicates with the Orchestrator, as different external systems will need different calls and data to be sent.
- You can find the
PipelineServiceClientabstraction here, - And the
AirflowRESTClientimplementation here.
The clients that implement the abstractions from the PipelineServiceClient are merely a translation layer between the information received in the shape of an IngestionPipeline Entity, and the specific requirements of each Orchestrator.
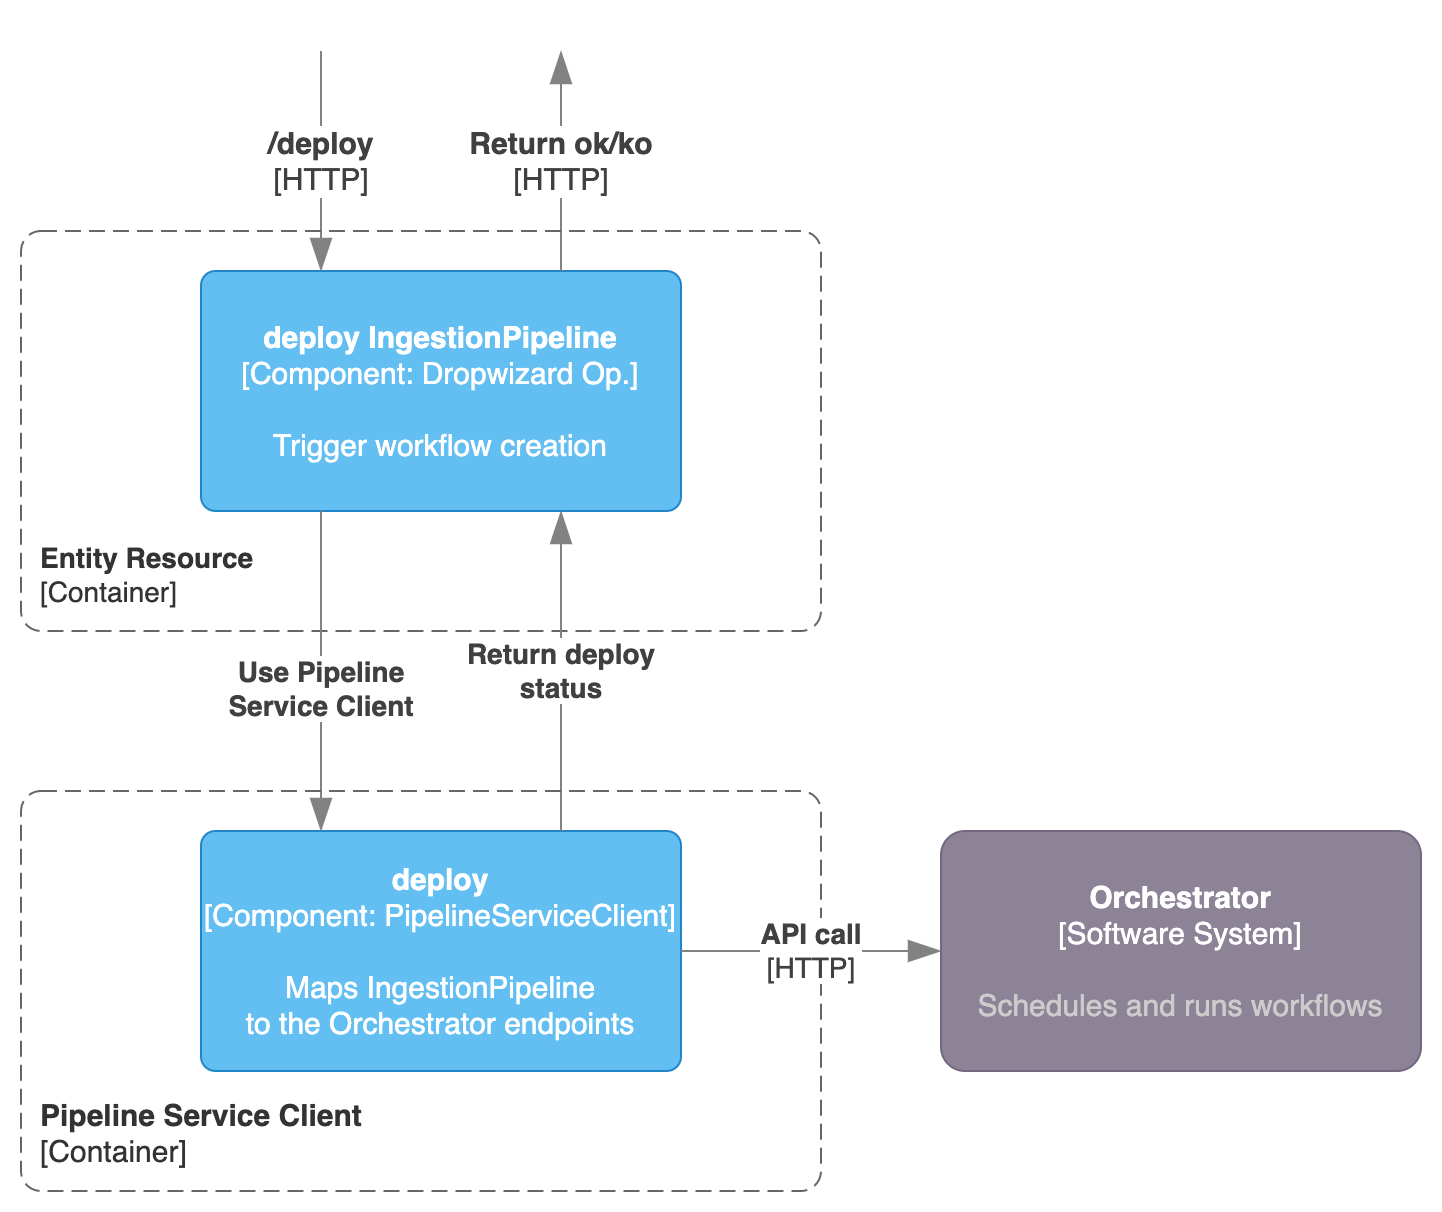
After creating a new workflow from the UI or when editing it, there are two calls happening:
POSTorPUTcall to update theIngestion Pipeline Entity,/deployHTTP call to theIngestionPipelineResourceto trigger the deployment of the new or updated DAG in the Orchestrator.

Creating the Ingestion Pipeline
Based on its JSON Schema, there are a few properties about the Ingestion Pipeline we can highlight:
1. service: a pipeline is linked via an Entity Reference to a Service Entity or a Test Suite Entity. From the service is
2. pipelineType: which represents the type of workflow to be created. This flag will be used down the line in the Orchestrator logic to properly create the required Python classes (e.g., Workflow, ProfilerWorkflow, TestSuiteWorkflow, etc.).
3. sourceConfig: which is dependent on the pipeline type and define how the pipeline should behave (e.g., marking ingesting views as False).
4. openMetadataServerConnection: defining how to reach the OM server with properties such as host, auth configuration, etc.
5. airflowConfig: with Airflow specific configurations about the DAG such as the schedule.
While we have yet to update the airflowConfig property to be more generic, the only field actually being used is the schedule. You might see this property here, but the whole process can still support other Orchestrators. We will clean this up in future releases.

Here, the process of creating an Ingestion Pipeline is then the same as with any other Entity.
Deploying the Ingestion Pipeline
When calling the /v1/services/ingestionPipelines/deploy endpoint defined in the IngestionPipelineResource, the Pipeline Service Client enters into play.
The client needs to be implemented with a separated class, which has the knowledge on how to interact with the Orchestrator. The role of OpenMetadata here is just to pass the required communication to the Orchestrator to trigger a deployment of a new DAG. Basically we need a way to send a call to the Orchestrator that generated a DAG / Workflow object that will be run using the proper functions and classes from the Ingestion Framework.

Any Orchestration system that is capable to DYNAMICALLY create a workflow based on a given input (that can be obtained from the IngestionPipeline Entity information) is a potentially valid candidate to be used as a Pipeline Service.
Deep Dive - Deploying an Ingestion Pipeline to Airflow
Now that we have the big picture in mind, let's go step by step on how we have defined this process in Airflow. The goal here is not to enter so much in Airflow specific details, but to explain what deploying an Ingestion Pipeline entails so that you feel engaged and prepared to contribute a new Pipeline Service Client implementation.
In this example I will be deploying an ingestion workflow to get the metadata from a MySQL database. After clicking on the UI to deploy such pipeline, these are the calls that get triggered:
1. POST call to create the IngestionPipeline Entity
2. POST call to deploy the newly created pipeline.
Create the Ingestion Pipeline
These are the details of such a call with the default parameters.
And we receive the created Ingestion Pipeline Entity back:
Deploy the Ingestion Pipeline - OpenMetadata
Once the Ingestion Pipeline is created in OM, the following request is sent:
Notice how we are passing the ID of the created Entity. Based on this ID, the IngestionPipelineResource will pick up the Entity and call the Pipeline Service Client
Then, the actual deployment logic is handled by the class implementing the Pipeline Service Client. For this example, it will be the AirflowRESTClient.
First, let's see what it is needed to instantiate the Airflow REST Client:
If we focus on the important properties here, we can see:
- username,
- password,
- and an API Endpoint
As we use a Basic Auth to connect to Airflow's API, those all the necessary ingredients. This is just Airflow specific, so any other Pipeline Service can tune this parameters as needed.
If we then check what has been implemented in the deployPipeline method of the Airflow REST Client, we will see that it is just calling a /deploy endpoint from its API root. What is this endpoint? What does it do?
Airflow Managed APIs
Airflow has many benefits, but it does not support to create DAGs dynamically via its API. That is why we have created the OpenMetadata Airflow Managed APIs Python package. This is a plugin that can be installed in Airflow that adds a set of endpoints (all that is needed for the Pipeline Service implementation), and more specifically, helps us create the bridge between the IngestionPipeline Entity and whatever Airflow requires to create a DAG.
We know that to create a new DAG in Airflow we need a Python file to be placed under the AIRFLOW_HOME/dags directory (by default). Then, calling the /deploy endpoint will make the necessary steps to create such a file.
What it is important here is to notice that in order to run a metadata ingestion workflow, we just need the following few lines of Python code:
Where the YAML config shape is defined in each Connector and the workflow class depends on our goal: Ingestion, Profiling, Testing...
You can follow this logic deeper in the source code of the managed APIs package, but the important thought here is that we need the following logic flow:
1. An Ingestion Pipeline is created and sent to the Ingestion Pipeline Resource.
2. We need to transform this Ingestion Pipeline into something capable of running the Python Workflow. For Airflow, this something is a .py file.
3. Note that as Airflow required us to build the whole dynamic creation, we shifted all the building logic towards the managed APIs package, but if any orchestrator already has an API capable of creating DAGs dynamically, this process can be directly handled in the Pipeline Service Client implementation as all the necessary data is present in the Ingestion Pipeline Entity.
Deep Dive - Pipeline Service Client
Now that we have covered the most important function (the deployment), let's list down what other actions we should be able to do with any Pipeline Service Client.
getServiceStatus: to check if we can properly reach the configured Orchestrator.testConnection: as an endpoint that allows us to test the connectivity from the Orchestrator to a specific service.deployPipeline: as explained above, to dynamically created a DAG in the Orchestrator.runPipeline: to trigger a DAG.deletePipeline: to delete a DAG.toggleIngestion: to pause or unpause a DAG from future executions.getPipelineStatus: to check the status of the latest runs of the DAG.getLastIngestionLogs: to pick up the logs of the latest execution.killIngestion: To kill all queued or ongoing runs of a DAG.requestGetHostIp: To get the pipeline service host IP. This can either be statically picked up from the OM YAML configuration or if the Orchestrator supports it, retrieved from there.